C# Advent Calendar – Combining Integration and UI Automation in C#
I signed up for the C# Advent Calendar with this post – be sure to check out the rest of the blog posts in the calendar! This post assumes you’ve got some experience with C# and Visual Studio, so I won’t be over-explaining some things. Comment if you get stuck or have questions!
If you’re here for the first time, welcome! I’m a “career QA”, been in the QA/testing field for just over 10 years now. I’ve been doing test automation with C# for several years, including CodedUI, Selenium, and integration tests (using NUnit or MSTest) for REST services, as well as unit testing. So I’m kicking off the C# Advent Calendar with a testing topic. Hope you enjoy!
My talk on Testing RESTful Web Services is all about evangelizing integration testing. Integration tests are sometimes missed between unit tests and GUI tests – developers may think it’s the QA’s job, and QA may think it’s the developer’s job, so they can fall through the cracks.
So why combine integration and UI tests? These are useful to see if the API and the UI are speaking the same language. They are often developed at the same time by different people, so it’s nice to have a safety net of tests that can be run whenever to verify things are still working properly.
I wrote a very simple web API for funsies (using this tutorial) and because it has an API and a web UI, it seemed like a great subject for this mixed tests treatment! My code can be found at my github, here: https://github.com/g33klady/MontyPythonApi.
Our test will:
- do a GET via the API for an item
- launch the UI and search for the same item
- compare the responses
Creating The Class Library For The Tests
Because this is pretty small, I’m just going to use a single project for my tests. In a larger application I might split them out. I’ll create a Class Library for all of my testing stuff. The first thing I do in general is add all of the NuGet Packages I need.
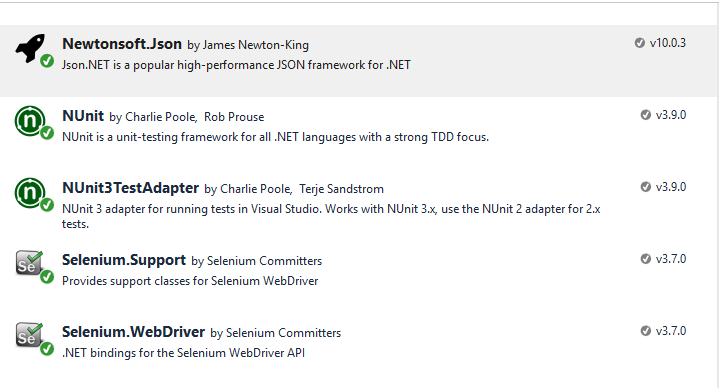
I then set up my structure.
For the UI tests, I know I’ll be using the Page Object Model so I create a folder for those, and add my HomePage class. I also know I’ll need some utility methods, so I add a Utilities class. I’ll wait to add the test classes until I’m ready for them.
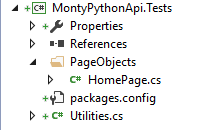
Setting Up The Page Objects
In essence the Page Object Model is decoupling the definitions of the elements on a page from the tests that use/manipulate them. This keeps the tests maintainable and not as brittle.
Our page is pretty simple. I’ve pointed out the elements we’ll want to put into the class. We’ll just be typing a number into the text field, clicking Search, and reading the response in the div below that.
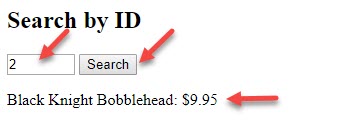
Each of my elements has an ID – easily identifiable elements helps us QA folks use the elements in automation. If I have to use Xpath, for example, the tests can be more brittle than if I tell the automation “find this thing with this unique identifier”.
This is what my class looks like with the text field identified:
using OpenQA.Selenium;
using OpenQA.Selenium.Support.PageObjects;

namespace MontyPythonApi.Tests.PageObjects
{
    public class HomePage
   {
        [FindsBy(How = How.Id, Using = "prodId")]
        public IWebElement ProductIdInput { get; private set; }
    }
}
The FindsBy is how Selenium will be finding the element, and then the property is of type IWebElement (so Selenium can find it) and I can call it whatever I want. I like to use the type of element it is in the name to make it more clear, especially when there’s tons of elements in there.
I’ll add the rest of the page elements, and then initializing the elements via the PageFactory (part of Selenium.Support.PageObjects):
using OpenQA.Selenium;
using OpenQA.Selenium.Support.PageObjects;

namespace MontyPythonApi.Tests.PageObjects
{
    public class HomePage
    {
        [FindsBy(How = How.Id, Using = "prodId")]
        public IWebElement ProductIdInput { get; private set; }

        [FindsBy(How = How.Id, Using = "searchButton")]
        public IWebElement SearchButton { get; private set; }

        [FindsBy(How = How.Id, Using = "product")]
        public IWebElement ProductDisplayOutput { get; private set; }

        public HomePage(IWebDriver browser)
        {
            PageFactory.InitElements(browser, this);
        }
    }
}
Any methods specific to this page will also go here. We can add them as we need them.
Setting Up The Utility Methods
For our integration tests, we’ll need to make HTTP Web Requests, and then get the response back and deserialize it. I prefer to deserialize it in the test itself, but if you want to do it in the utilities be my guest 😀
Our utility class looks like this (the formatting sucks – check out the code instead here):
using System;
using System.Net.Http;
using System.Text;

namespace MontyPythonApi.Tests
{
    public class Utilities
    {
        public static HttpResponseMessage SendHttpWebRequest(string url, string method, string content = null)
        {
            using (var httpClient = new HttpClient())
            {
                var httpMethod = new HttpMethod(method);

                using (var httpRequestMessage = new HttpRequestMessage { RequestUri = new Uri(url), Method = httpMethod })
                {
                    if (httpMethod != HttpMethod.Get && content != null)
                    {
                        httpRequestMessage.Content = new StringContent(content, Encoding.UTF8, "application/json");
                    }
                    return httpClient.SendAsync(httpRequestMessage).Result;
               }
            }
        }

        public static string ReadWebResponse(HttpResponseMessage httpResponseMessage)
        {
            using (httpResponseMessage)
            {
                return httpResponseMessage.Content.ReadAsStringAsync().Result;
            }
        }
     }
}
Now We Can Write Our Test!
Now to the good stuff.
I start with the SetUp method, which runs prior to every test. This is where I set the browser driver up – what Selenium uses to make the browser bend to its will.
using NUnit.Framework;
using OpenQA.Selenium;
using OpenQA.Selenium.Chrome;

namespace MontyPythonApi.Tests
{
    [TestFixture]
    public class IntegrationAndUiTests
    {
        private IWebDriver browser;
        private static string webUrl;
        private static string apiUrl;
        private static string baseUrl;

        [SetUp]
        public void Setup()
        {
            browser = new ChromeDriver();
            baseUrl = "http://localhost:20461";
            webUrl = baseUrl + "/index.html";
            apiUrl = baseUrl + "/api/products";
        }
    }
}
I instantiate the browser driver (using IWebDriver from Selenium) in the SetUp method because each test will need a new instance of it. Like all good tests, these need to be atomic.
We need a TearDown method as well, to clean up after ourselves.
[TearDown]
public void TearDown()
{
    browser.Quit();
}
I’m going to set up my test to first make the call to the API, then use an Assert to verify that I got a 200 OK response back. This isn’t necessary but I find it useful – my tests fail here rather then trying to deserialize later on, so I know where things went wrong more quickly.
So we know our test is going to make a call to the API about a product, then verify the data in the web UI. We have a requirement that if a product has a discount price, it’s the only price that will display in the web UI. We set up our test data so that the product with ID = 1 has a discount price, so that will be the subject of our test.
[Test]
public void ProductsDiscountPriceDisplaysOnWebPage()
{
    //API call
    var uri = apiUrl + "/1"; //get the product with ID = 1
    var apiResponse = Utilities.SendHttpWebRequest(uri, "GET");
    Assert.That(apiResponse.IsSuccessStatusCode,
      "Did not get success status code; got " +
      apiResponse.StatusCode.ToString());
}
Our test has started to take shape. We are making our call, and getting the response back. We’re verifying it got a 200 OK back but nothing else with it yet.
Let’s deserialize the response, so we can get the discount price value. To do that, I need to add the reference to the API project first, so I can use the model.
Here’s my code now, after having deserialized the response, using the utility method to read the response content into a string:
[Test]
public void ProductsDiscountPriceDisplaysOnWebPage()
{
    //API call
    var uri = apiUrl + "/1"; //get the product with ID = 1
    var apiResponse = Utilities.SendHttpWebRequest(uri, "GET");
    Assert.That(apiResponse.IsSuccessStatusCode,
      "Did not get success status code; got " +
      apiResponse.StatusCode.ToString());
    Models.Product product = JsonConvert.DeserializeObject(Utilities.ReadWebResponse(apiResponse));
}
Now we have the data that is returned for the product. We can now launch the web browser with Selenium and get the data returned in the web UI.
I need to have the browser go to the url, and then instantiate my page object:
//WebUI
browser.Navigate().GoToUrl(webUrl);
PageObjects.HomePage page = new PageObjects.HomePage(browser);
Now I can use the properties of page to interact with the elements on the page.
//WebUI
browser.Navigate().GoToUrl(webUrl);
PageObjects.HomePage page = new PageObjects.HomePage(browser);
page.ProductIdInput.SendKeys("1");
page.SearchButton.Click();
I’m essentially typing 1 into the search field, and clicking the search button.
Next I need to read the display of the data as it came back for that product. It comes back in a string with the format <Name> : $<Price> so I’ll need to parse it. Because this is something I’ll be doing on this page for more tests, I’ll add this utility method to the HomePage class.
public string GetPriceFromDisplayText(string displayText)
{
    decimal result;
    Regex r = new Regex("\\$(.*)");
    Match m = r.Match(displayText);
    decimal.TryParse(m.Groups[1].Value, out result);
    return result;
}
Definitely could hit some exceptions along the way, but for now we’ll leave it as-is.
Now our Web call looks like this:
//WebUI
browser.Navigate().GoToUrl(webUrl);
PageObjects.HomePage page = new PageObjects.HomePage(browser);
page.ProductIdInput.SendKeys("1");
page.SearchButton.Click();
var displayedPrice = page.GetPriceFromDisplayText(page.ProductDisplayOutput.Text);
And we can finally add that assert statement to check our values! Here’s our full test:
[Test]
public void ProductsDiscountPriceDisplaysOnWebPage()
{
    //API call
    var uri = apiUrl + "/1"; //get the product with ID = 1
    var apiResponse = Utilities.SendHttpWebRequest(uri, "GET");
    Assert.That(apiResponse.IsSuccessStatusCode,
      "Did not get success status code; got " +
      apiResponse.StatusCode.ToString());
    Models.Product product = JsonConvert.DeserializeObject(Utilities.ReadWebResponse(apiResponse));

    //WebUI
    browser.Navigate().GoToUrl(webUrl);
    PageObjects.HomePage page = new PageObjects.HomePage(browser);
    page.ProductIdInput.SendKeys("1");
    page.SearchButton.Click();
    var displayedPrice = page.GetPriceFromDisplayText(page.ProductDisplayOutput.Text);

    Assert.AreEqual(product.DiscountPrice, displayedPrice, "The prices don't match!");
}
Let’s run it and see what we get! Because the API and the tests live in the same solution, we’ll need to open a new instance of Visual Studio to run the tests locally.
Time For Some Results
And… our test fails!
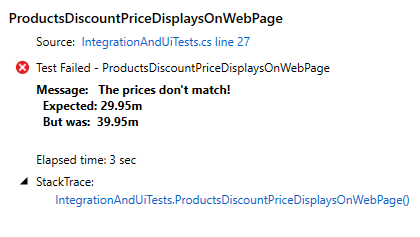
There’s a bug in the UI code that should display the discount code. Would we have found this otherwise? Probably with a good unit test, but this is a nice way to combine our tests and see how the application really behaves.
I’m leaving the bug there in the repo, so you can follow along. All of the code demonstrated above is there.
Let me know what you think – is this something you could use? Is this too much overhead for your project? Is this useful?

I’m Hilary Weaver, also known as g33klady on the Internets. I’m a Senior Quality Engineer working remotely near Detroit, I tweet a lot (@g33klady), and swear a lot, too.

4 Commments
Comments are closed.